
Publish Content to your Site using the right Content Type and Tools
Content Types

An article could be a news item, a blog post, a staff news item, or an informational article. Articles are timely content and include a date.
How to create a new article
- Select Content from the menu line and hover to choose Add Content>Add Article
- Enter the title of the article in the title field. A good descriptive title helps boost the search relevancy of the article.
- Optional: Enter a short title. The short title displays as the link text when the node is referenced in a listing (static or dynamic).
- Enter the summary text. The summary text displays as the text to provide context within a search result. It also displays as the teaser text for the download page in a dynamic listing.
- Enterdisplay date of article. The display date is metadata related to the article content. The display date is not necessarily the same date the article is posted to the website. The display date should coincide with the date the article was released to the media. The date entered in this field determines the chronological placement of the article in a dynamic listing.
- Optional: Select article type(s). Each article type is a term that can be applied to the node to categorize it for display in dynamic listings.
- Optional: Add a thumbnail image. The thumbnail image displays as a thumbnail or background image when the node is referenced in a listing (dynamic or static) and where the display option includes image.
- Optional: Add a banner image. The banner image displays as background behind the Article title and date. The minimum recommended size for a banner image is 1240x600px. If no Banner image is applied, background defaults to display the dark green texture behind the title and date text.
- Select the primary office.
- Optional: Enter contributor by typing the last name of the contributor into the details contributor entity reference field and waiting for the autocomplete to select the correct name. The contributor node displays a short bio for an individual who provided research for or contributed to the article.
- Add taxonomy, including a topic tag and audience as required.
- Save as draft, review content or publish the node.
*Scroll to the template section of this page for guidance on template types, how to add a template to your content node and how to add listings.

Pages are for static content, which means that the content is relatively unchanging or does not have time currency. There are no dates associated with the Page content type.
How to create a new Page node:
- Select Content from the menu line and hover to choose Add Content>Add Page
- Enter the title of the page in the title field.
- Optional: Enter a short title. The short title displays as the link text when the node is referenced in a listing (static or dynamic).
- Enter thesummary text. The summary text displays as the text to provide context within a search result.
- Optional: Add a thumbnail image. The thumbnail image displays as a thumbnail or background image when the node is referenced in a static listing where the display option includes image.
- Optional: Add a banner image. The banner image displays as background behind the article title and date. The minimum recommended size for a banner image is 1240x600px. If no banner image is applied, background defaults to display the dark green texture behind the title and date text.
- Select the primary office under office assignments.
- Add taxonomy, including a topic tag and audience as required.
- Save as draft or review the node and publish if satisfied.
View an example of a published page

Use the Event content type to create events that can be dynamically listed. An event contains location and date information.
How to create a new event:
- Select Content from the menu line and hover to choose Add Content>Add Event
- Enter the title of the page in the title field.
- Optional: Enter a short title. The short title displays as the link text when the node is referenced in a listing (static or dynamic).
- Enter thesummary text. The summary text displays as the text to provide context within a search result.
- Optional: Add a thumbnail image. The thumbnail image displays as a thumbnail or background image when the node is referenced in a static listing where the display option includes image.
- Optional: Add a banner image. The banner image displays as background behind the article title and date. The minimum recommended size for a banner image is 1240x600px. If no banner image is applied, background defaults to display the dark green texture behind the title and date text.
- Select the primary office under office assignments.
- In the details section, enter the contact text. The contact information provides additional context for who to reach out to for questions.
- Set the event start date/time.
- Set the event end date/time.
- Select the time zone where the event will take place.
- Optional: Select the event type. You can select one or more event types to use as tags for event content by holding down shift (optional).
- Optional: Add more info link information. A url or link text can used to link any relevant articles or information (optional).
- Optional: Add specific location information. The specific location should include details on where the event will be taking place and if in-person or virtual.
- Add taxonomy, including a topic tag and Audience as required.
- Save as draft or review the node and publish if satisfied.

A person node is created for someone who works at the Department of Energy or one of its branch offices or labs. Person nodes can be referenced as contributors for articles or in a static listing for things like leadership pages or blocks.
*Please contact CMS Support to create a person node. Once the node is created, you will be able to edit its content.
How to edit a person node.
- In the Content Manager, you can search for the person/title to filter to content nodes with that name in the title. If you know the node ID, you can enter it in the search bar like this, replacing the xxx with the node ID. /node/xxxxxx
- Optional: Enter first name.
- Optional: Enter last name.
- Enter title held by the person.
- Optional: Enter prefix of contributor, if applicable.
- Optional; Enter suffix of contributor, if applicable.
- Enter the name of the person in first name, last name order.
- Optional: Provide short name, if applicable.
- Optional: Add headshot image. Minimum recommended resolution: 600px x 600px. used as thumbnail image when contributor node is linked/ referenced. Will display as circular thumbnail. Will get automatically cropped as a circle to the center of the image when displayed in listing (static) paragraph.
- Change theprimary office under office assignments if needed.
- Optional: Enter the summary text. The summary text displays as the text to provide context within a search result
- Optional: Enter email of person.
- Optional: Enter the career highlights field. Any career highlights for this person. You may use multiple values; please put one highlight per field.
- *Recommended- save and proceed to layout and utilize a 2 Column with Media template for the headshot image and bio text.
- Save as draft or review the node and publish if satisfied.
**We want to ensure only one person node exists for each actual person, so their career achievements follow them across different offices in the department. From an existing article's /edit, or using /node/add/article, search in the contributor field in the details section for the article. Search for your intended person's name there. If you find it,do not create a duplicate. You can edit it if it belongs to your group, otherwise, contact DOECMS Support for the next steps, of either transferring the person node to your group, or sending the update request to the current content owner.
Note: The content view does not show nodes from other offices, so is not good for verifying this.
View an example of a published person node.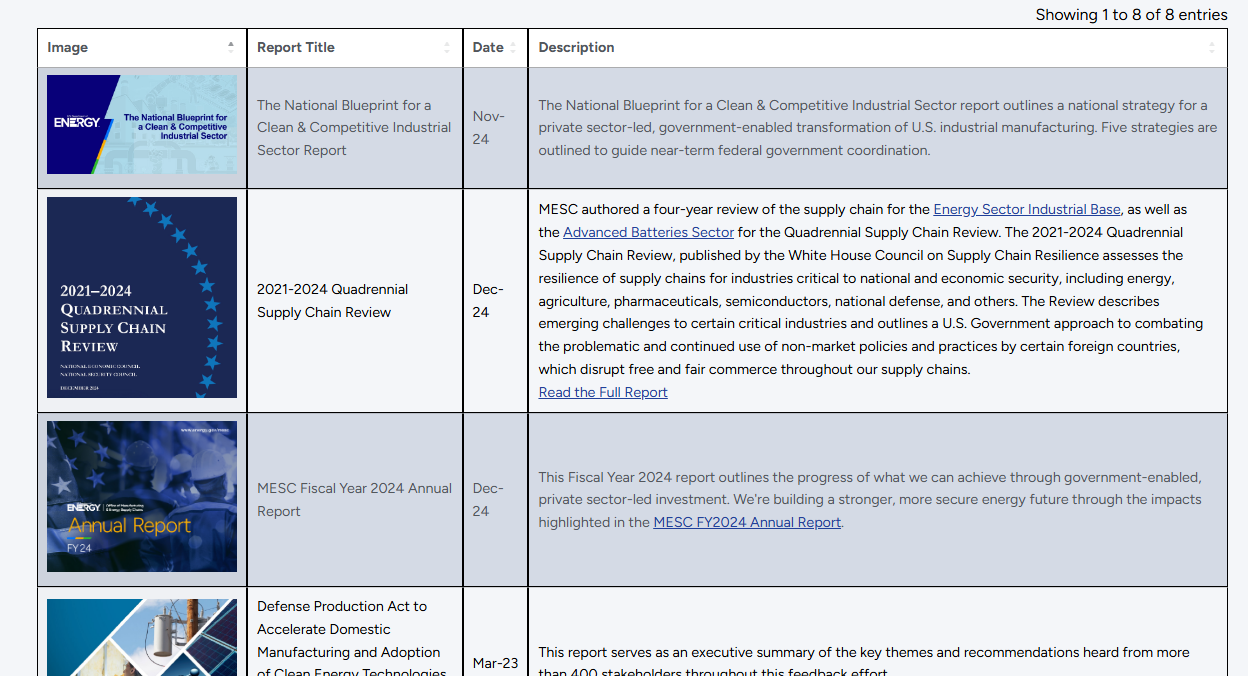
The Pivot Table is a dynamic content type that allows you to upload CSV data, and return a feature rich data table complete with facets and search.
How to create a new pivot table:
- Select Content from the menu line and hover to choose Add Content>Add Pivot Table
Basics Tab
- Enter thetitle of the node in the title field. A good descriptive title helps boost the search relevancy of the pivot table.
- Enter thesummary text. The summary text displays as the text to provide context within a search result.
Table Details
- Enter a title for the pivot table data. This title provides context for the pivot table data set.
- Click choose file to Attach the .csv data file from your local drive to the pivot table.
- You can click remove to remove the current .csv file and upload a replacement file.
- When saving as .csv from MS Excel, the file can include ‘special’ characters, which do not work well when uploading the file. You can clean up the file by saving it as a .csv file from Google sheets or cleaning up the .csv in a .txt file.
- Select the display type
- Select facet color
When configuring your pivot table, you will be given the option to display your content in the classic pivot table display format, or as an advanced list. The advanced list option will have a different look and feel, as well as additional colors that do not appear on the regular pivot table display.
Data Columns- Enter the column title from the .csv file in the CSV column title field
- Make sure the title matches exactly to the column title used in the .csv file
- Column titles in the .csv cannot include spaces—use analysis_categories vs analysis categories
- If spaces are included in the .csv column titles, the pivot table will not render
- Select the type of data represented in the .csv column in the data type field.
- Accept the default setting or select date, if the .csv column is a date.
- Select the primary office under office assignments.
- Add taxonomy, including a topic tag and audience as required.
- Save as draft or review the node and publish if satisfied.
Please contact CMS Support at doecms-support@hq.doe.gov if you need additional assistance with creating a pivot table or creating the .csv file for a pivot table.
A Photo Gallery is a series of photos that include a photo field for title, captions, and credit attribution.
How to add a photo gallery content node:
- Select Content from the menu line and hover to choose Add Content>Add Photo Gallery
- Enter the title of the page in the title field.
- Optional: Enter a short title. The short title displays as the link text when the node is referenced in a listing (static or dynamic).
- Enter thesummary text. The summary text displays as the text to provide context within a search result.
- Optional: Add a thumbnail image. The thumbnail image displays as a thumbnail or background image when the node is referenced in a static listing where the display option includes image.
- Select the primary office under office assignments.
- Optional: Enter a short byline for the photo gallery.
- Optional: Enter the display date and time for the photo gallery.
- Add taxonomy, including a topic tag and audience as required.
- Add photos content in the photo region. Add the following content and information for each gallery item in the file information region.
- Click choose file to select an image. Files must be less than 60 MB. Allowed file types: png, gif, jpg, jpeg.
- Click the upload button.
- Enter photo title for image.
- Enter a caption for the image. By including a caption, the 508 compliance is met for a text alternative for an image.
- Enter a credit to provide the attribution, if known.
- Repeat steps, as needed.
- Click save to publish the node.
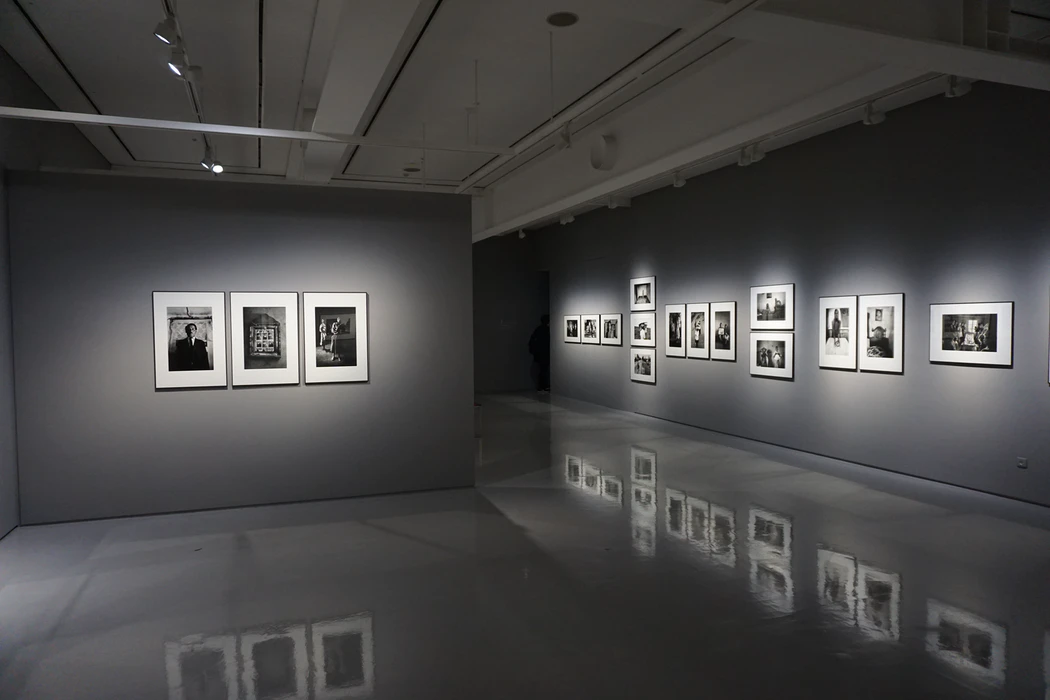
View an example of a published photo gallery.
Topics are nodes to organize and display all energy.gov content related to a topic. Topic nodes work alongside content tagged with topics- please coordinate with Public Affairs/ CMS Support to create new topic nodes.
*Topic nodes are designed with a standard layout across topic pages. Please coordinate with Public Affairs for approval to modify the standard layout.
Program Pages are office and suboffice pages intended to display a program's mission, areas of focus, leadership, contact information and relevant links a site visitor could benefit from.
*Program Pages are formatted to a standard layout across programs- please coordinate with Public Affairs/ CMS Support to create a new program page or for approval to modify the standard layout.
Template Types
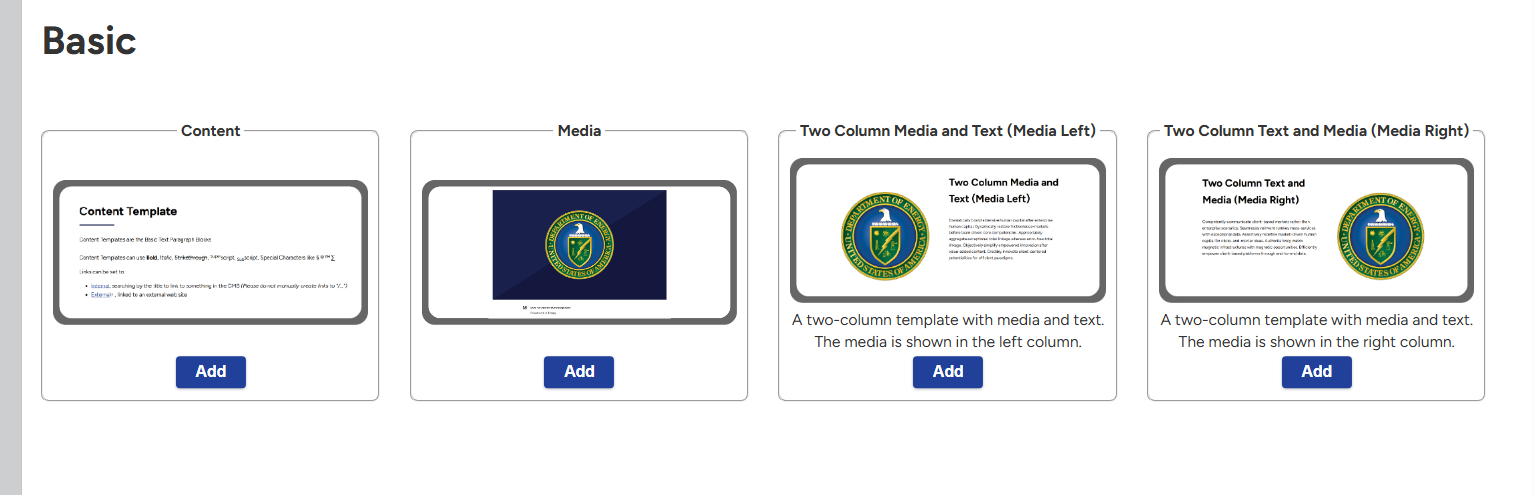
Basic templates are your basic text content blocks. They include paragraph blocks, media blocks and two-column with media styles. These templates can utilize text that is bold,italic,
strikethrough, superscript, subscript, or special characters like § ® ™ ∑. They can include bulleted and numbered lists.Basic templates can include internal links (searching by the title to link to something in the CMS and external links (linked to an external web site).
*Please do not manually create links to "/...")Within content, you may utilize the heading style drop down to format text.
All blocks utilize an option to include a clickable button that directs to a url. You can modify the text that appears on the button by customizing the link text field. So instead of saying "View More", your button could say " For More Information" or "Learn More".
View examples of a basic template including media
or
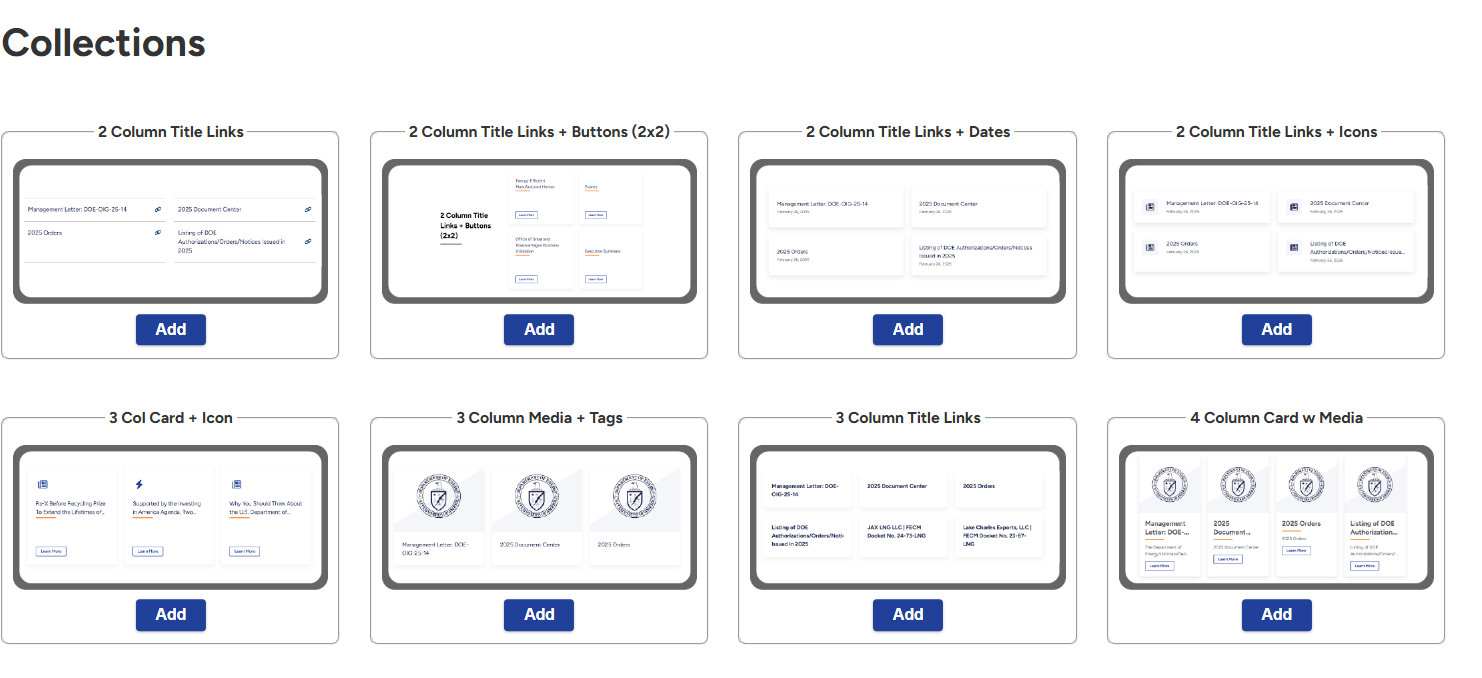
Collections are groups of cards displayed together in a page template or section. Collections can contain links to internal nodes or external sites and reference content or media. They can include both dynamic and static listings.
Included with the collection templates is an option for a split column collection. This allows you to pull in two listings into a dual left/right collection style.Click below for recommended guidelines when adding collections to office pages, topic pages, or other page types on Energy.gov.
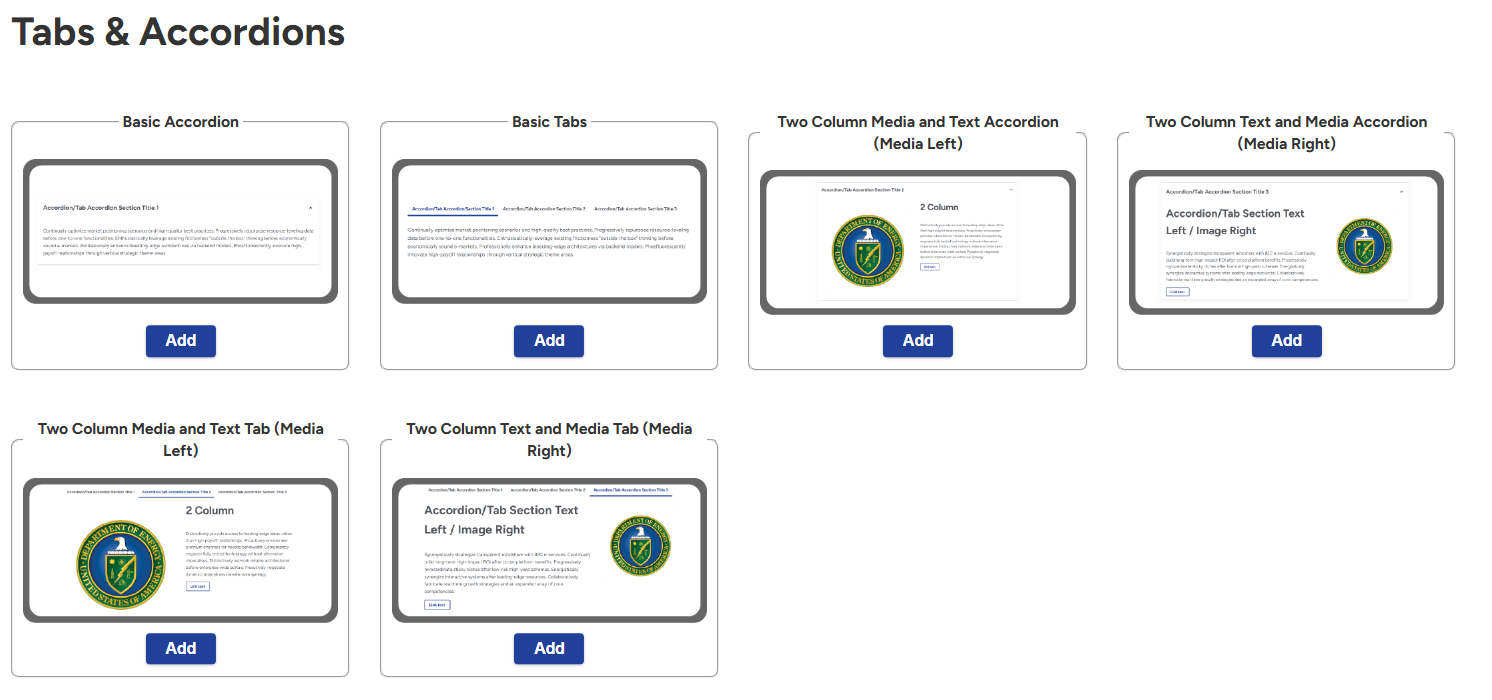
Tab and Accordion sections provide alternative ways to contents large amounts of content on a singular page.
Tab sections will display links in a horizontal bar across the page that can be clicked to toggle between subsections containing contents while accordion sections can expand and collapse to display or hide subsections containing content.
- Label the first Tab/ Accordion item using the Accordion Section Title field.
- In the text field, enter the text/content that will display.
- If you have chosen a Tab/Accordion with Media style, click on the Media tab to add your media item.
- The settings tab allows you to adjust the ratio between media and text.
- If you wish to add a url button, you may do so in the text tab's button section.
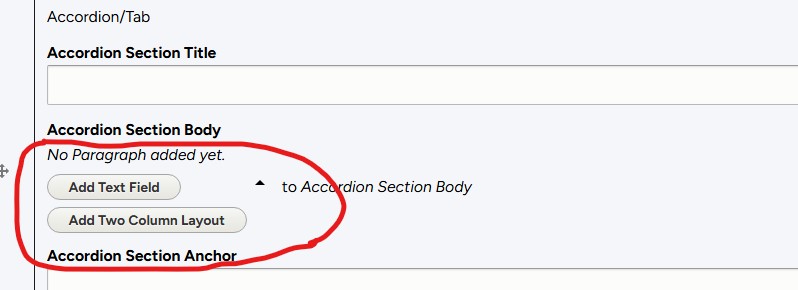
- Select the Add Accordion tab to add an additional accordion/tab item.
*When you add a new item, you will need to indicate whether you want a single text field or if you would like a two-column layout (which would include a field for media). You will only see a button for adding a text field. To expand that selection, click the divot next to that button to view the additional choice as indicated in the screen image below. If you add a field with text and change your mind, you will lose that text when making the switch to a different field layout. It can be helpful to copy the text before making the switch, so you can paste it in the new text field.
Image
Click Add Block once you are done adding items.
When you Save your Layout. Be sure to preview your changes in the Active Draft tab before Publishing (or the View tab, if the node hasn't been published yet.) Blocks and paragraphs may appear different when placed in Tabs and Accordion Sections.
Deleting the Tab/ Accordion Items or Sections will also delete all contained content!
View samples of Accordions and Tabs
The CMS Support site contains tabs and an accordion style section for comparison.
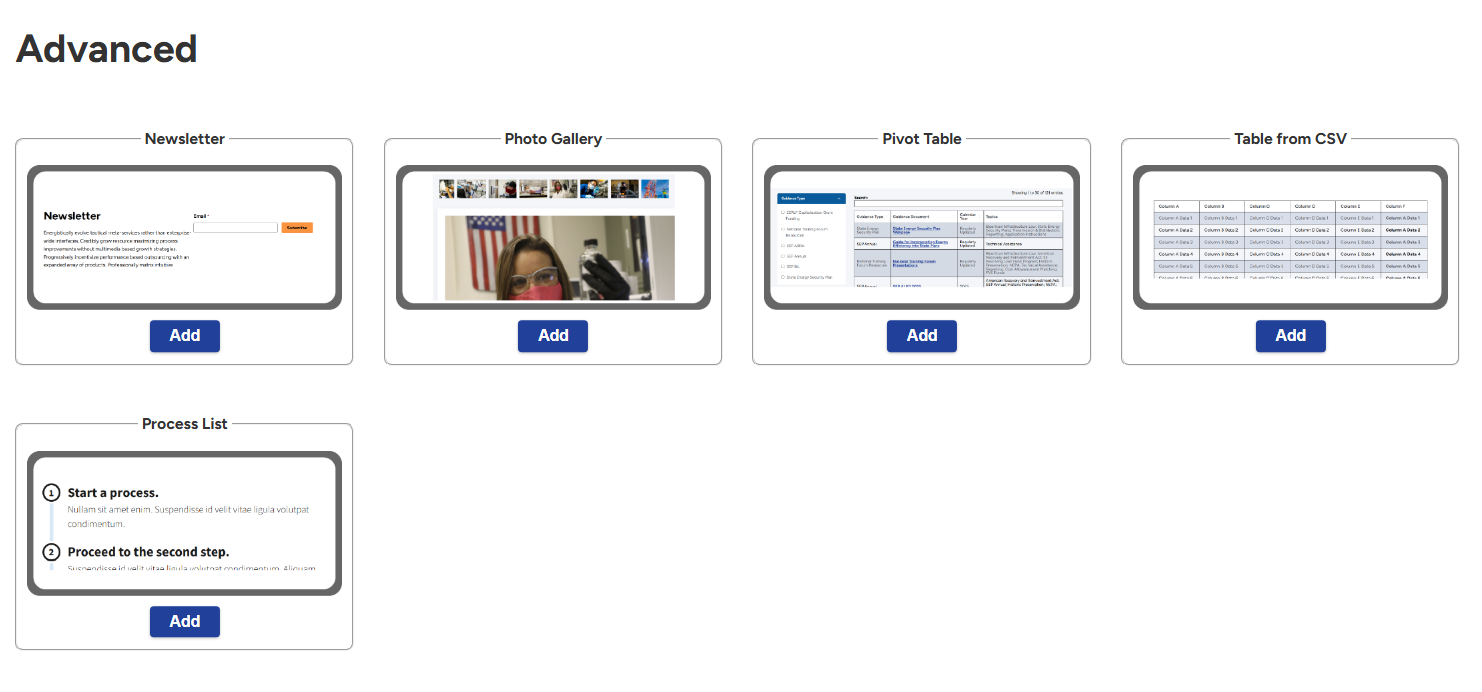
The advanced templates section is where you can find a pre-designed template to use for a photo gallery, pivot table, a table from a csv file, a process list, or a newsletter form. Newsletter can be used for a subscription section of a page.
View examples of advanced templates
Please contact CMS Support if you need assistance with these template styles.

Selecting a template
- To add a template to your article or page, click on "Add Template" in the section you wish to add content.
- A template browse window will open, allowing you to scroll and find the template you wish to use.
- Once you find it, click "Add" under that template to add an empty template to your content type. You can add more than one template to a block.
If you need assistance with adding content to a template, please contact CMS Support.
Media Types

Adding an image can help your content look more presentable and appealing.
How to add a new image:
From Content Manager> Media> Add Media>Image
Basics Tab
- Upload your image file from the choose file image field.
- Enter the image file’s name in the name field.
- Enter alternative text. This field appears after the image is uploaded. This text will be used by screen readers, search engines, or when the image cannot be loaded. This is important for 508 accessibility compliance.
Optional: Enter an image caption. Image caption is used as a title or explanation for a picture or illustration.
Details Tab- Optional: Enter date and time taken.
- Optional: Enter attribution.
- Optional: Enter description.
Tagging Tab
- Optional: Enter a topic or audience
Select the primary office under office assignments.
Optional: Edit the revision information, url alias, and authoring Information as necessary.
Click save to successfully add your Image.
Use a document file for a single file, such as a PDF or Word document. Documents can be added to content in media templates, as a type filter in dynamic listings, and as a media type in static listings. Document creation can be used to upload important files for future reference. Below are the steps to create a new document file.
How to create a new document:
From Content Manager> Media> Add Media>Document
Basics Tab
- Upload your document file from the choose file field. Only one file can be uploaded. 60 MB limit. Allowed types: doc, docx, pdf, ps, xls, xml, ppt, xps, odt, odtx, odp, css, csv, html, txt, odg, odf, rtf, pptx, xlsx, ods, fodt, fods, fodp, fodg, key numbers pages.
- The description field will open. This may be used as the label of the link to the file.
- Enter the Document file’s name in the Name field.
PDF only tab (Optional for PDF's)
- Enter the subject in the subject box.
- Select the status.
- Select the published date and time.
- Enter author.
- Enter Federal document ID.
- Enter location.
- Enter MDS.
- Enter original File.
Tagging tab
- Optional: Enter a topic or audience
Select the primary office under office assignments if prompted.
Optional: Edit the revision information, url alias, and authoring information as necessary.
Click save to successfully add your document.
View an example of a media document in use.
You can also pull in media documents as a listing, using one of the collection templates.

Audio files can be created to be added to Content to improve their relevance and quality. Below are the steps to create necessary to create a new Audio file.
How to create a new audio file:
From Content Manager> Media> Add Media>Audio
Basics Tab
- Upload your audio file from the choose file field.
- Enter the audio file’s name in the name field. (Required)
- In the transcript section, upload a vtt file if you have one. This will allow a transcript to display and flow as the audio is being spoken.
Tagging tab
- Optional: Enter a topic or audience
Select the primary office under office assignments if prompted.
Optional: Edit the revision information, url alias, and authoring information as necessary.
Click save to successfully add your document.

External Resources link to pages or resources outside of Energy.gov
When you are referencing a site outside of Energy.gov, make sure you begin the link with https:// rather than http:// to promote security!
How to add an external resource.
From Content Manager> Media> Add Media>External Resource
Basics Tab
- Enter the external resource's name in the name field.
- Optional: Enter a short title . The short title displays as the link text when the node is referenced in a listing (static or dynamic).
- Optional: Enter the summary text.
- Optional: Add alternative thumbnail. You may provide an optional image that will be used as a thumbnail or background image.
Details Tab
- Enter the external url in the url text box. Start typing "https://.." and enter the full URL of the external link
- Note: This is not supported, but you can also enter an internal path such as /node/12345 or an external URL such as https://example.com. Enter <front> to link to the front page. Enter <nolink> to display link text only.
- Enter link text.
Tagging tab
- Optional: Enter a topic or audience
Select the primary office under office assignments if prompted.
Optional: Edit the revision information, url alias, and authoring information as necessary.
Click save to successfully add your external resource.
View examples of an external resource.
Use Interactive media to embed maps and interactive content via an iFrame, or explore the possibilities using the H5P libraries!
How to create interactive media:
From Content Manager> Media> Add Media>Interactive
Basics Tab
- Enter the name of the interactive media in the name field.
- Enter the summary for the interactive (optional). Text that will appear whenever this node shows up in a listing or for a shortened explanation of what this node contains. Content limited to 150 characters, remaining: 150
- Expand the Advanced divot to enter a short title. A shorter version of the title for listings, blocks, or search result
- Enter the display date and time(optional).
- Thumbnail image (optional). Add an additional image to be used in search results and when shared to social media. Please ensure the image is at least 600x600 pixels. Type part of the media name. See the media list (opens a new window) to help locate media. Allowed media types: Image
Details Tab
- Select make full width. If checked, when this interactive is viewed it will take up the entire screen width of the user's browser, instead of being constrained to the single column that the standard design of the site uses (optional).
- Select CSS scaling. Disabling will prevent map from scaling with window size (optional).
Custom section
- Enter markup (optional).
- Enter custom JS (optional).
- Enter custom CSS (optional).
Mapping Section
- Select hide map title. This option is if you’d like the Interactive title be hidden from the bottom left corner of the interactive (optional).
- Select map library (optional).
- Select map type (optional).
- Enter Byline (optional). A subheading for this map will be displayed below the title.
H5P Section
INTERACTIVE CONTENT - H5P, click on the type of interactive content you want add to the Media
Tagging Tab
- Enter a topic or audience (optional)
Select the primary office under office assignments if prompted.
Edit the revision information, url alias, and authoring information as necessary (optional).
Click save to successfully add your document.
View the different options for Interactive H5P media.
Learn How to embed SimpleMaps configured from the website
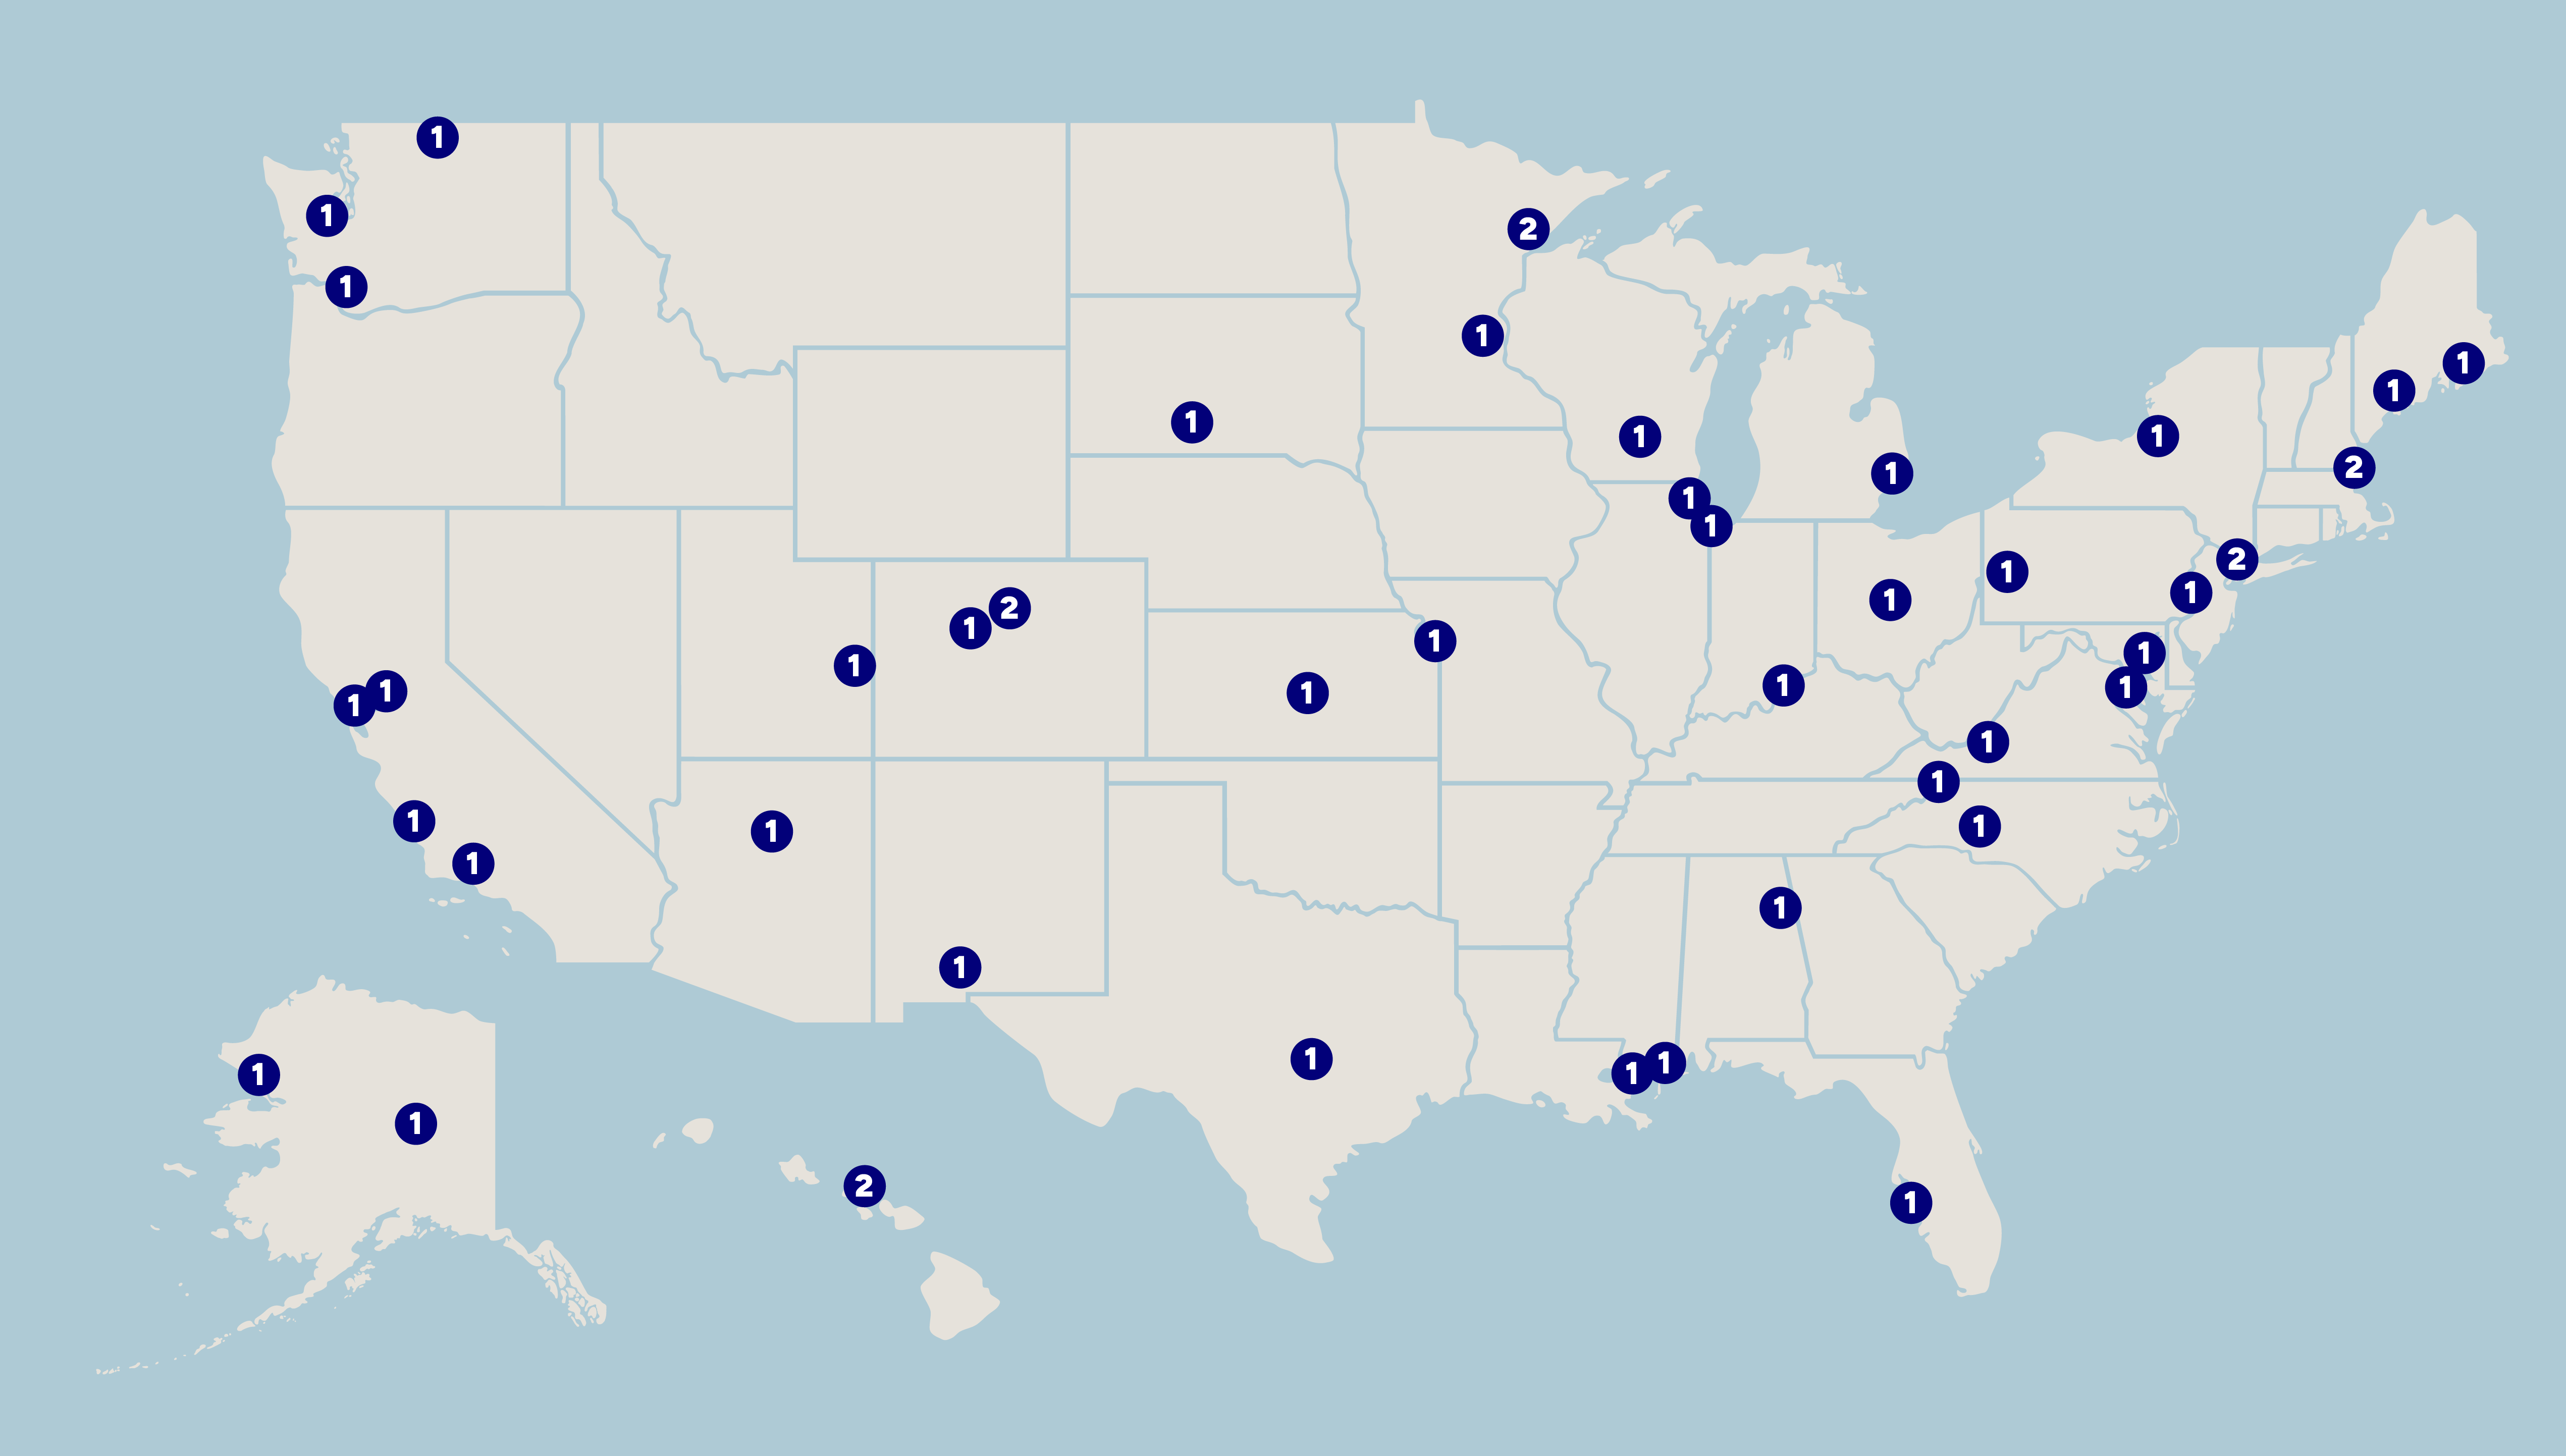
Use the Map media feature to effortlessly integrate interactive maps into your page, enabling location-based content customization with no coding required!
How to create map media:
From Content Manager> Media> Add Media>Map
Basics Tab
Enter a descriptive title for the map in the name field.
Details Tab
Note: All 50 states will auto populate and will be editable. Other U.S territories will have to be manually put in
States
- For editing States/U.S Territories (optional):
- Enter a description. This description will appear when a user clicks on the specific state that is being edited.
- Select whether or not to hide the state
- Select whether or not to make the state inactive
- Choose what color you want the state to be. When the "other" option is chosen a color picker pops up
Legend
- To add a legend to a map, click Add US Map Legend. The legend will appear underneath the map.
- Enter a name for the legend
- Choose the shape you want the legend to be, i.e. star, circle, square, etc.
- Select the legend type.
- Choose what color you want the shape to be. When the "other" option is chosen a color picker pops up
- Select what state you want to include in the legend. Note: When a user hovers over the legend, the states included will be highlighted
Regions
- To add a region to a map, click Add US Map Region.
- Enter a name for the region.
- Choose the states/territories from the "States" dropdown
- Write a brief description in the "description" box
- Select a color from the "Color Options" if desired. Note: If you want to add a region to the legend, the color you choose here must match the color in the legend section. If they are different, it won't work.
- Check the "Disable Zoom" box if you want the region to be non-zoomable. This means states/territories in this region will not be clickable.
Locations
- To add a location to a map, click Add US Map Location.
- Enter a name for the location
- Enter the latitude of the location in decimal form
- Enter the longitude of the location in decimal form
- Select the shape of the location from the dropdown menu
- Enter a description of the location using the text editor provided
- Enter the URL that will be opened when the location is clicked. You can start typing the title of a piece of content to select it or enter an internal path
- Select the color for the location from the dropdown menu. Note: If you want to add a location to the legend, the color you choose here must match the color in the legend section. If they are different, it won't work.
- Select the color that will appear when the location is hovered over.
Settings
- Choose the language you want the map to appear in. Choose between English and Spanish.
- Choose the background color of the map.
- Choose the States colors. The color you choose here must match the color in the legend section. If they are different, it won't work.
- Select the color that will appear when the state is hovered over.
Tagging Tab
- Optional: Enter a topic or audience
Select the primary office under office assignments if prompted.
Edit the revision information, url alias, and authoring information as necessary (optional) .
Click save to successfully add your document.
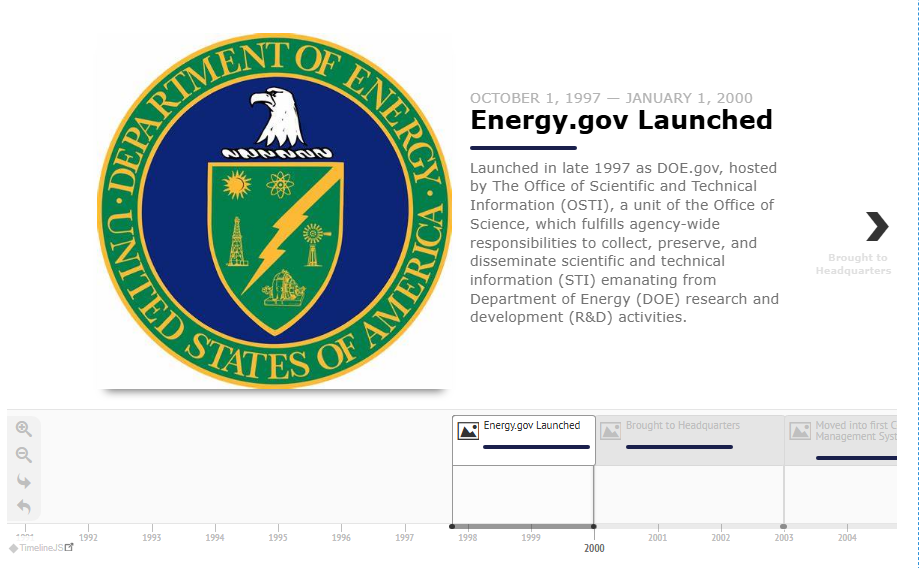
Create a Timeline to showcase important dates
How to create a timeline:
From Content Manager> Media> Add Media>Timeline
Basics Tab
- Enter the name of the timeline in the name field.
- Enter a short title (optional). A shorter version of the title for listings, blocks, or search results.
- Enter an image for the timeline. This field is generated by default by the media entity and cannot be deleted.
Details Tab
For each timeline item:
- Enter the headline.
- Enter the body.
- Enter the start date for the timeline (required). Date format: Year only (2014) Full date (2014, 1, 23)
- Enter the end Date for the timeline. Date format: Year only (2014) Full date (2014, 1, 23)
- Enter the timeline media remote (optional).
- Add media to the timeline media local (optional).
- Add timeline media credits.
- Add tags
- Add more timeline items, as necessary.
Tagging Tab
- Enter a topic or audience (optional)
Select the primary office under office assignments if prompted.
Edit the revision information, url alias, and authoring information as necessary (optional).
Click save to successfully add your document.

Embed video media to add relevant visual multimedia.
How to add a new video
From Content Manager> Media> Add Media>Video
Basics Tab
- Enter the name of the video in the name field.
- Enter a short title (optional). A shorter version of the title for listings, blocks, or search results.
- Enter a summary for the video
- Enter an alternative thumbnail (optional).
- Select display date and time (optional).
Body Tab
- Enter Body information (optional)
Details Tab
Please utilize YouTube for video content and the YouTube url for this media type.
- Enter video URL in the URL field.
- Enter a Caption.
- Enter an Attribution.
- Enter Description (optional).
- Enter Start Time by selecting the number of seconds (optional).
- Enter End time by selecting number of seconds (optional).
Tagging Tab
- Enter a topic or audience (optional)
Select the primary office under office assignments if prompted.
Edit the revision information, url alias, and authoring information as necessary (optional).
Click save to successfully add your document.View an example of a published video media type.
Adding a Media Block
See instructions below on how you may add media to a page using a media block.- Navigate to the Layout Tab for the content where you would like to add Media
- Select 'Add Media' to add a new Media Block into the page's Layout
- Select existing Media from the Library, or select 'Upload' to create new Media.
- Once you have added your desired media, select 'Insert Media' to add it to the Media Block in the node's Layout..
For some advanced Customization of your Image and Video Blocks, use Override Text Fields.
- Check the Display Override Text Fields checkbox
- Note: These override text fields apply only to Image and Video media types.
- Optional: add Caption Text Override
- Text that appears under the image/video. If the image/video chosen has the "Caption" field filled in, and this field is left blank, that text will display instead.
- Optional: add Attribution Text Override
- Text that describes the source of the image/video. If the image/video chosen has the "Attribution" field filled in, and this field is left blank, that text will display instead.
- Optional: add Alt Text Override
- Text that appears in place of an image if an image file cannot be loaded. If this field is left blank, the "Alt" field from the image will display instead.
- Optional: add Link URL
- For content in the site. start typing the title of a piece of content and select it from the dropdown. You can also enter the node ID number to select the node.
- For external content, make sure it is linked using "https://..."
Multiple Files?
Dynamic/Static Listings
Learn More About...
Writing & Accessibility Guidance
As Energy.gov website users continue to develop content, it is important to ensure all content, whether it be a full page, a headline, or even a call-to-action (CTA) button, be written for the public. Accessibility is critical to DOE, and the website is one way to exemplify that commitment. Below are 10 ways to write for the web and specifically for optimized accessibility when creating new content.
- Use the words that users use: By featuring the keywords that the public uses, you can make your mission clear as well as assist users when they are looking for specific topics. When creating new Topic pages, keep this in mind especially.
- Use embedded, contextual links: When linking either to a partner site or even within energy.gov, it is helpful to provide context rather than simply spelling out the URL. You can do this by writing the link text so it describes what information the link will take you to, making it more meaningful.
- Avoid using all caps for emphasis: Writing in ALL CAPS draws attention but can be a turnoff to a user. It can be difficult for screen readers to interpret and may make it more difficult to read for many users. A better way to give emphasis is to use italics, bolding or even pulling that information out to visually stand out.
This is a common style used in the legacy system. It is recommended to update all uses of all capitalization to sentence case.
- Use Plain Language: In 2010, the Plain Writing Act was signed into law. The linked website has many helpful resources. It requires the federal government to use clear language and communication the public can understand and use. Using clear and concise language is important when communicating with the wide audiences that DOE is reaching.
- Incorporate image alt text: Alt text is short for alternative text and is important to website users with vison impairments. Alt text is a short statement that describes the function and appearance of an image, icon, chart, or non-interactive element on a web page. Every such asset on energy.gov should come with respective alt text. Alt text can be added when uploading the image to the site. Alt text also improves search engine optimization (SEO) and is a fundamental principle to ensure an ADA-compliant site.
- Provide video captions/transcripts: Just like alt text for images, transcripts/captions are important to make videos accessible. Adding transcripts or captions for videos is also a fundamental principle to ensure an ADA-compliant website.
- Use section headings: Section headers make it easy for users, with or without accessibility screen readers, to find information. Headers stand apart from body text and allow a user to scan through text content on a page. Headers can also provide SEO value when using contextual keywords and phrases that point to the content that follows. Headings should not skip hierarchy and there should only be a single H1 per webpage; multiple H1 headings will confuse individuals using a screen reader.
- Use sentence case for section titles and other elements: Sectioning information helps users scan information. When it comes to section headers, two practices are very commonly used:
- Title Case: What is New in Wind Energy? - hard to read
- Sentence case: What is new in wind energy? - easier to read
Users may struggle to identify if a capitalized word in a section header is a “specific, named thing or a general concept.” Make a website experience more accessible by taking the thinking out of it. You are setting a user up for a more complex experience if they must spend time deciphering the nuance in your message structure.
- Keep paragraphs short: Paragraphs on a web page should not look the same as a paragraph in a textbook or magazine. A website is a different medium than print, and audiences engage with it differently. The following are some suggestions that can help promote readability, accessibility and overall good communication.
- Use short, clear sentences
- Keep paragraphs short, 2-3 sentences
- Consider lists instead of narrative blocks, if appropriate
- Write in active voice
- Skip filler words and superfluous descriptions
- Use contextual links
- Remember you are a human who is writing for other humans
- Write purposeful page titles: Page titles can provide additional context to information on a page and how that information is unique when compared to other pages. In addition to increasing accessibility, meaningful page titles can also provide another opportunity for SEO value.
As you work within the CMS and with other CMS users and support staff, you may hear terms that are familiar. Utilize this Glossary of Terms for Energy.gov to refresh your CMS vocabulary knowledge.
There are many roles within the Energy.gov CMS that can be assigned to User accounts. Your assigned role will dictate the permissions that you have within the CMS.
When requesting a new CMS User Account for yourself or others, include the desired roles you would like for the account to have in your email to the CMS Support Inbox.
Prior approval from Office POC is needed for all changes to account roles and permissions.
What are these user roles?
Main User Roles
Basic Editor- Basic Editors can edit all types of content and media within the CMS that is owned by their Office Group(s). They may create Articles, Events, Listings, and Pages. Basic Editors are unable to Publish content unless paired with the Publisher role.
Advanced Editor- Advanced Editors can edit and create all types of media and content. A User with this role is unable to Publish content unless paired with the Publisher role.
Publisher- Publishers can publish content from other Moderation States (eg Unpublished, Needs Approval, Draft) to their Office Group(s). CMS Users with this role are unable to edit/create content unless paired with Basic or Advanced Editor roles.
Reviewer- Reviewers may review unpublished draft content and media on the site regardless of Office Assignment without needing and Access Unpublished token. Users with this role are unable to create, edit, or publish content Media.
Other User Roles
Administrator- Administrator permissions are reserved for the CMS Support Team. Site Administrators are able to create, edit, or otherwise modify all content and configurations on the site, regardless of Office Assignment.
Can Change Group Assignment- When paired with the Editor role, this role gives CMS Users the ability change the group assignment of content from the Edit tab.
Custom Topics Creator- CMS Users with this role can create Custom Topics to be used across the site.
Interactive Editor- Interactive Editors are able to modify the full HTML fields for the Interactive Media Type.
Podcast Manager- Podcast Managers may create, modify, and manage podcasts within the CMS.
Webform Results- CMS Users with this role can view the results form Webforms on the Energy.gov site.
You also have two different types of Users.
Anonymous User- Anonymous Users are any visitors who navigate to cms.doe.gov or energy.gov without signing in. Anonymous users are unable to edit, create, modify or view unpublished content unless they have been provided with a temporary unpublished access link.
Authenticated User- Authenticated Users are all individuals who are logged in to a valid, active CMS Production Account.
Selecting a Homepage, Media or Banner Image
Helpful Tips
Create contrast between text and featured image color
- Pay attention to the text and image color selected in the Edit tab (see screenshot below)
- Insert dark images for white text overlay
- Insert light images for dark text overlay
- For Banner image selection, ensure you're using a dark image so the Office, Title, and Date stand out.
Pay attention to color distribution
- For Homepage featured items, the text will appear at the bottom of your image. The colors in this portion are particularly important!
- For Banner images, the text will appear in the middle. Be cautious using photos or logos that have action or text in the middle of the image.
Busy isn't better!
- Images that have a lot of action or different colors in the background have the potential to distract from other content on your homepage. Busy images may also make it difficult to read the text overlay.
- The only option for the amount of featured items that can go on a homepage is 0, 1, or 3.
- Banner images must be at least 1200px x 400px. Maximum file size should generally be less than 5MB.
You may use the resources below to locate stock images.
- U.S. Department of Energy | Flickr
- Energy Technology Visuals Collection - Powerpedia
- - DOE Enterprise Search Search Results (usa.gov)
- Videos - DOE Enterprise Search Search Results (usa.gov)
- Image - Powerpedia (energy.gov)
You may also explore the Media Library to find examples of Banner images already used throughout the site. Search the following Media items by the names listed below for examples:
- LPO_Vogtle_homepagefeature3.jpg
- DOE-LPO_Banner_Fossil.png
- Crumpled Paper
- DOE Press Release Preview Image
- Blue and White Abstract.png
- Green Blue Banner.png
- Blue and White Abstract Technology
- DOELAP Banner
- DOE Logo.png
- 18DOE-Cyber_Slider_NoText.png
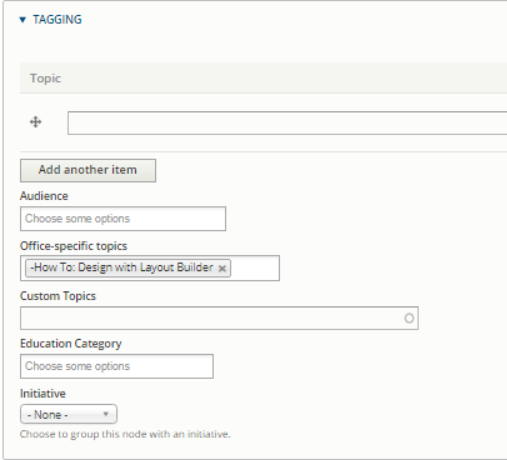
Taxonomy, a powerful core module, gives your sites use of the organizational terms that allow you to connect, relate and classify your website's content. In Drupal, these terms are gathered within "vocabularies".
The Energy.gov Drupal platform employs global and office-specific vocabularies. Global vocabulary terms are shared by everyone in the platform; whereas, Office-Specific Topic terms are created at the request of a primary office group. These Office-Specific Topic terms are shared from the primary office group to its nested group(s), but these terms are not shared to other primary office groups.
Global Vocabularies
Energy.gov Platform Level Topics: A list of global terms that can be used to create collections of articles, download pages, or events based on a term. Multiple terms can be selected, but you must drill down to a term and add it. Then, drill down to the next term and add it. Only the bolded term at the end of a drill down is applied.
Energy.gov Platform Level Audience Terms: use these terms to target collections of articles, download pages, or events to specific audiences. Multiple terms can be selected.
Custom Topics: This freetext vocabulary allows us to create taxonomy terms on the fly. Sometimes there is a need to provide additional granularity to collections of articles, download pages, or events. In these cases, it may be necessary to combine an Office Specific Topic with a Custom Topic term. Please contact a System Administrator to work with the Custom Topic vocabulary.
Office-Specific Topic
Using the terms your office provided, system administrators created a list of Office-Specific Topics (OSTs) for your organization. Those Office-Specific Topics make up your organization's vocabulary. We can add to the vocabulary, if needed. Or, we can delete unused terms. Please contact a System Administrator, if you have questions about your office's vocabulary.
Image
These links provide corrections steps for the following Level A errors.
- Scan #: 1.1.1 Non-text Content >> Alternative text for the image is a file name
- Scan #: 1.3.1 Info and Relationships >> Heading is missing text
- Scan #: 1.3.1 Info and Relationships >> HTML is used to format content
- Scan #: 2.4.4 Link Purpose (in Context) >> Link text used for multiple destinations
- Scan #: 2.4.4 Link Purpose (in Context) >> Image link is missing alternative text
- Scan #: 2.4.4 Link Purpose (in Context) >> Link text is too generic in its current context
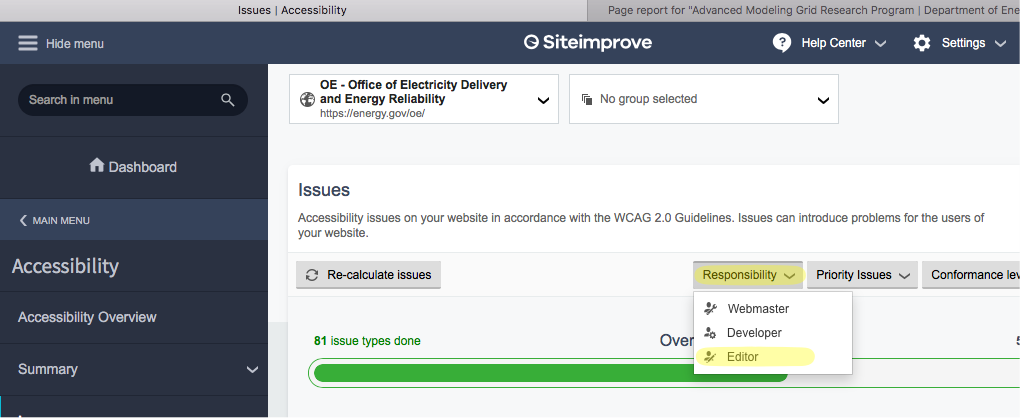
These links provide correction steps for the following SiteImprove Warnings [siteimprove warning icon] .
- URLs with underscores
When logged into SiteImprove, there is a Responsibility filter toggle. Select Editor to filter to issues where content editors are responsible for making corrections to content.
Image
Scan #: 1.1.1 Non-text Content >> Alternative text for the image is a file name
The alternative text is used by a screen reader to read aloud the purpose of the image for a visually impaired user. A file name is rarely of use, as everything is read out, including underscore and slash.
SiteImprove indicates the fix is:
Make sure the alternative texts reflects the purpose of the image.Editor Responsibility
Content editors must provide alternative text that reflects the purpose of the image.
Learn more about Alternative Text.Image Located in Old Body Field or a Block
If the image is located in the old Body field of the node or within a block, you must restage the node to use the new body field and paragraphs. Use the Image paragraph to include the image and provide alternative text that reflects the purpose of the image.
- If you are uploading a new image to replace the old one, you are required to provide alternative text for all images
- If you are selecting the image from the Media Library, use the Alt Text Override field on the Image paragraph to include alt text
Scan #: 1.3.1 Info and Relationships >> Heading is missing text
The tag for the heading is present, but there is no text in the tag.
Editor Responsibility
Use the SiteImprove scan report to identify the location of the missing heading text on the node. The report also indicates the type of heading tag that is missing text.
If SiteImprove reports one similar to this, it means an empty Heading paragraph was left on the node.
<h4 id="" classes="entity entity-paragraphs-item paragraphs-item-paragraphs-sp-heading
psp subsection-subheading"></h4>To address the error, open the node for edit and add the heading text to the Heading paragraph or, if no heading is needed, remove the empty Heading paragraph.
If SiteImprove reports one similar to this, it means there is an empty Heading tag in a rich text field or paragraph.
HTML tag: H4
Text content:
HTML: <h4> </h4>To address the error, open the node for edit, locate the rich text field or paragraph containing the empty header. Click Disable rich-text. Scroll within the html code of the text to find the empty header tag. For the example above, it would be: <h4> </h4>
- If no heading text is needed, delete the entire tag: <h4> </h4>
- If heading text is needed, highlight the html code for a space ( ) and enter the heading text, click to Enable rich-text, verify the heading text displays, save, and publish the node.
Scan #: 1.3.1 Info and Relationships >> HTML is used to format content
Presentational attributes such as 'border', 'align', or 'bgcolor' are used. CSS should be used for styling instead.
Developer Responsibility
Filter out tags such as border, align, and bgcolor from html tables within Rich Text (Full) paragraphs. This may cause some styling issues on legacy content, but does not remove content.
Editor Responsibility
Content editors must restage old body field content containing html tables using styles such as border, align, and bgcolor. Refer to tab 1 of the shared spreadsheet link below, to view a list of nodes containing html table content in the old body field. These nodes must be restaged using either the Rich Text (Full) or Data Table paragraphs to correct the SiteImprove issue.
https://docs.google.com/spreadsheets/d/15GyayUwXNJkPUjGHs2VfYIqVGH-f-5c9l8v5uSQ6kSE/edit?usp=sharing
Scan #: 2.4.4 Link Purpose (in Context) >> Link text used for multiple destinations
Developer ResponsibilitySome changes to improve aria labeling have been made by technical support. For example, the View More and Learn More links within Listing (Dynamic) and (Static) paragraphs now include the title of the node the View More or Learn More links to as part of the aria label making the label unique.
SiteImprove is having a hard time reconciling the aria label with the text used for the link in paragraphs where a title override is included. A ticket has been submitted to technical support for a resolution to the issue.
Editor Responsibility
There are some issues in this category where content owners and editors could choose to do a simple correction. For example, making inline links in rich text fields using the same link text or using link text that does not do enough to distinguish one link from another. Link text like: Click here, here, Read More, More, etc. does not include enough information about where the link is going.
Click here to learn about EM's environmental cleanup story.
Click here to learn more about DOE's Office of Legacy Management.
SiteImprove indicates the fix is:
If the destination pages are not the same, make sure the links can be distinguished by their link texts or WAI-ARIA labels ('aria-labelledby' or 'aria-label') alone to make the difference clear to all users.
So, for the links above, this would be better.
Learn more about EM’s environmental cleanup story.
Learn more about DOE’s Office of Legacy Management.
So now, the link text makes a clear distinction of what the user can expect when they follow the links. For the sighted user, the visual cues indicate a link and for sighted and non-sighted users (using a reader), the link text provides context for the link destination.Scan #: 2.4.4 Link Purpose (in Context) >> Image link is missing alternative text
Editor ResponsibilityContent editors must provide alternative text that reflects the purpose of the image.
Learn more about Alternative Text.Image Located in Old Body Field or a Block
If the image is located in the old Body field of the node or within a block, you must restage the node to use the new body field and paragraphs. Use the Image paragraph to include the image and provide alternative text that reflects the purpose of the image. If the Image includes a link, the alternative text should include the purpose of the link.
- If you are uploading a new image to replace the old one, you are required to provide alternative text for all images
- If you are selecting the image from the Media Library, use the Alt Text Override field on the Image paragraph to include alt text
Scan #: 2.4.4 Link Purpose (in Context) >> Link text is too generic in its current context
Link texts should be written so they make sense out of context. Generic texts such as “Click here” and “More” give no indication as to the destination of the links.
Editor Responsibility
Content owners and editors can choose to do a simple correction to generic link text to provide an indication of the link destination.
Link text like: Click here, here, Read More, More, etc. does not include enough information about where the link is going. You must include link text that provides an indication of the link destination.
So, instead of Read More, include the destination and make the destination the link text instead of the generic text. Read more about the DOE Strategic Human Capital Plan. (Helps avoid the SiteImprove Issue: 2.4.4 Link Purpose (in Context) >> Link text used for multiple destinations.)
Warning: URLs with underscores
URLs with hyphens (-) rather than underscores (_) are preferred by Google for identifying what a page is about. Underscores are treated as "word joiners" whereas hyphens are treated as "word separators". Hence hyphens make URLs easier for search engines–and real people–to read.
Editor Responsibility
Content owners and editors can choose to use the following file naming best practices when, naming image and document files for Web use.
- Use all lower-case
- Separate words with a dash (-)
- Never include punctuation marks
- Never include spaces
- Make image filenames a good description of the subject matter of the image
- Make document filenames descriptive by including key terms to make the content user-friendly and search-friendly
- Keep file names short -- you should be able to include descriptive terms and remain under 50 or 60 characters (including the dashes and excluding the filename extension)
Do the above for image files as well as document files to increase the SEO of the files.
Energy.gov’s Drupal CMS has the ability to create webforms but there are certain regulations (i.e., Paperwork Reduction Act and Privacy Impact Assessment) that need to be followed to be a good steward to the data the public provides DOE.
Contact Us webforms that include ONLY an optional email entry field, a comment entry field, and a submit button may bypass the Paperwork Reduction process (Step 1) and the completion of DOE F 1322.4 - Forms Checklist (Step 2). All other forms MUST receive the approvals required below before they can be published to energy.gov.
Energy.gov Webform Request
Step 1 - Paperwork
Since every webform on Energy.gov is a public form, the first step in getting an Energy.gov webform is to begin the Paperwork Reduction Act process.
Paperwork Reduction Act
The Information Collection Program (ICP) within the Office of the Chief Information Officer (OCIO) provides general oversight, support and technical guidance to DOE programs who are seeking to sponsor and information collection. ICP should be contacted prior to any information collection effort being initiated.
PRA Contact: doepra@hq.doe.gov
Privacy Impact Assessment
If the webform will collect Personally Identifiable Information (PII), a Privacy Impact Assessment (PIA) will need to be filed. The Privacy Program can be contacted via
PIA Contact: privacy@hq.doe.gov
Once the Office of Management and Budget (OMB) has approved the webform, it will be assigned a form number and you should contact the Forms Manager to fill out the checklist.
Forms Manager’s Checklist
Tonya Meadows, the DOE Forms Manager, can be reached at Tonya.Meadows@hq.doe.gov or 202-586-8230
- Your office will need to fill out DOE F 1322.4 - Forms Checklist.
- Once the form’s PRA and checklist both have been approved, please send them to DOECMS-Support@hq.doe.gov and answer the questions below.
Step 2 - Support and Implementation
Please send the answers to the following questions to DOECMS-Support@hq.doe.gov for review.
- Has the form request been reviewed and approved by the appropriate officials within your office?
- If so, please provide name and contact info of approving official(s).
- Have you identified the email address(s) where the submitted information is to be sent?
- Have you identified an appropriate user to monitor submissions?
- Does the user who is monitoring the submissions have the appropriate clearance and/or training on the appropriate handling of submitted information?
- Does the form have a defined lifespan?
- If so, what are the start and end dates for submissions?
- Who is responsible for un-publishing the form and archiving results?
- Have you developed a long-term maintenance/monitoring plan (if applicable)?
- Have you identified where the webform is to be located on your site?
- Have you provided a title for the page?
- Have you included copy/instructions for the form?
- Has the copy been spellchecked and proofread?
- Have you identified all form field names and the associated data type (text box, select menu, etc.)?
- Have you included copy for the submission page?
- Has the submission page copy been spellchecked and proofread?
If I was really clever, I'd have made all that a webform.
Boilerplate Privacy Language
Below is guidance that has been provided by the Privacy Office. It is intended to provide the visitor with information about the webform, how the data will be used, and instructions on filling out the webform.
An example where this language can help:
If we include the following text on the webform “Do not provide any information beyond what is asked for on this form,” then DOE is not liable, if someone decides to add his or her SSN or DOB. We simply need to delete the data and inform the submitter that the data was deleted.
AUTHORITY: cite a directive, Executive Order, regulation, initiative, etc., that justifies the collection.
PURPOSE(S): briefly describe the purpose for collecting the information.
ROUTINE USES: briefly describe how the information will be used outside DOE, if applicable.
DISCLOSURE: state this is "Voluntary. However, failure to provide the requested information could (explain the consequences of not providing the information). "
And add a Notice to the affect: Do not provide any information beyond what is asked for on this form.
Content Governance seeks to remove outdated content from the site and to give Offices greater autonomy over their content.
Content Governance Workflow
Image
The Content Governance Workflow is to be implemented as part of the Content Clean-Up Initiative. The ultimate objective of this initiative is to automate the cleanup of outdated webpages and to empower Offices to modernize their content.
- Automated workflows will govern the lifecycle of content based on tags and expiration dates assigned by Offices directly on their nodes.
- Please Note: This workflow will govern all content within the CMS with the exception of Homepages.
- Throughout this process, the system will send automated email notifications informing Offices of the actions they need to take to keep their content relevant
- Some workflows will prompt Offices to update older content, while others may automatically archive outdated materials. This will be determined by the Tag assigned to the content (see 'Content Governance Status' section below).
Content Governance Status
The Content Governance Status of a node will be determined by the Content Governance Tag. These tags provide a standardized way for Offices to identify the lifespan of their content. Tags will be assigned individuals with Editor/Publisher permissions. You will only be able to assign a Content Governance Status to nodes within your office. This status will also be used by the system to run automated processes that will unpublish and remove outdated content.
Content Governance Tags may be assigned under the Moderation State configuration when looking at a Node in Layout Builder. The tagging options are as follows:
- Temporary: Content is temporary and does not need to remain on the site indefinitely. If no action is taken, content will be unpublished at the time of expiration.
- Content will have an expiration date that may be set when you create or edit a node. The default expiration date for Temporary content will be 3 years.
- Example: News or Blog Article
- Evergreen with Periodic Updates Required: Should be preserved on the site, needs regular maintenance.
- Content will have an expiration date that may be set when you create or edit the node. Note: This content type will not be unpublished at the time of expiration.
- Example: Leadership Page
- Statutorily Required: Content should be preserved on the site for legal or policy reasons. Content should be updated regularly to maintain relevance. If no action is taken, content will be unpublished at the time of expiration.
- Content will have an expiration date that may be set when you create or edit a node.
- Example: Expiring Contracts or Budget
- Purge: Content is flagged for removal and automatically archived.
- Example: Test Node
The Content Governance Status and Expiration Date of a node may be updated at any time by an User with the appropriate permissions and group assignments. Changing the Status or Expiration Date will update the workflow for the content.
Content Governance Report
The Content Governance Report is now accessible in the CMS to help you keep track of how your content is tagged and when it is set to expire.
This report looks similar to the view found at cms.doe.gov/admin/content, but will include additional columns and filters specific to Content Governance, such as Expiration Date.
This report, which may be downloaded as a .csv file, is useful for monitoring the status of content to maintain relevance.
The Content Governance Report is currently available to those with Basic Editor and Publisher permissions in the CMS.
Archived Moderation State
Under the Content Governance Workflow, the 'Unpublished' moderation state will become 'Archived.'
Content that is Archived will no longer be available to CMS Users.
Content may become Archived if it has Expired, depending on the Content Governance Tag assigned to the node by the Office. Content tagged as 'Purge' will be automatically Archived.
CMS Users with Publisher permissions may also manually update nodes to the 'Archived' state.
Please note: Nodes that are currently in the 'Unpublished' state will become Archived once the Content Governance Workflow is implemented.
- Automated workflows will govern the lifecycle of content based on tags and expiration dates assigned by Offices directly on their nodes.
CMS Support Responsibilities User Responsibilities Advanced User Rights Unblock Users Edit Group pages Create Pivot Tables Create breadcrumb trails Manage content Create Person nodes Provide CMS Training and access to production Maintain Content Governance workflow Create person nodes Publish/ Unpublish content Edit menu and navigation bars Adhere to Section 508 Accessibility guidelines Assist with setting up pages Create nesting groups Assist with technical problems regarding CMS Answer questions regarding CMS
What's in the Pipeline?
You can find the list of updates and fixes coming up in the User Focus Backlog Tickets
Can you repeat that? What's that called?
Still getting used to the Energy.gov Drupal CMS lingo? Learn more and search for specific terms in the Energy.gov Glossary
CMS Access Prerequisites
New users (or content contributors) must meet the following criteria before being granted access to the production CMS:
- Authorization from content owner of sponsoring Program or Staff Office
- Authorization from either the System or Application owner
- Identification of assigned roles in Office and Nested Groups
- Registration in DOE Identity Management
- Completion of the Drupal EnergyGov CMS training
Remote Access Links:
PKI Support Services
Remote Access OptionsHow do I log in?
Log in to the Drupal WCMS. Use the following procedure to login to the WCMS using the credentials provided by DOECMS-Support@hq.doe.gov:
1. Go to /user. The User Account Login page appears.
2. Enter your complete DOE email address as your Username.
3. Enter your password.
4. Click Log In.
How Do I Get My Password Reset?
Use the following procedure to reset your password.
1. Go to /user/password. Or, click the Request new password tab on the User Account Login page. In either case, you are prompted to enter your username or email address.
Enter your username or email address.
3. Click Submit. You will receive an email containing instructions and a link to reset your password.
4. Go to the link you receive in the email message. The Reset Password page appears.
Password Requirements
Passwords must contain:
at least one UPPERCASE letter
at least one lowercase letter
at least one number
at least one special character (`~!@#$%^&*()_-+={}[]|\"';:?/.,><).Passwords should:
Be at least 8 characters in length
Begin and end with a letter (UPPER or lowercase)Passwords should not:
Contain your username
Be a previously used passwordOnly one password change is allowed in a 24-hour period. For assistance, please contact:
DOECMS-Support@hq.doe.gov.Change your Drupal CMS Password
When you login to the site, the navigation on the left appears.
From the navigation window, you can click the Edit tab to access the Change your password input form.
If you are already logged in, you can access the edit page by clicking Edit on the top right of the shorcut bar and then click the Edit tab to access the Change your password input form.
Password Requirements
Passwords must contain:
at least one UPPERCASE letter
at least one lowercase letter
at least one number
at least one special character (`~!@#$%^&*()_-+={}[]|\"';:?/.,><).Passwords should:
Be at least 8 characters in length
Begin and end with a letter (UPPER or lowercase)Passwords should not:
Contain your username
Be a previously used passwordOnly one password change is allowed in a 24-hour period. For assistance, please contact:
DOECMS-Support@hq.doe.gov.Change Password
Use the following procedure to change your password.
- Enter your current password in the Current Password field.
- Enter your new password in the Password field.
- Re-enter your new password in the Confirm Password field. (Make certain your new password entries match.)
- Use the drop-down list to change your local Time Zone setting, if needed. Otherwise, skip to step 5.
- Click Save.
Why Am I Blocked?
There are two situations that may cause your account to be blocked.
First-Time Login
When your user account is first created, an automated process triggers and sends an email message to you that includes a one-time login link to the CMS password reset page. You must create a new password on this page. As a security precaution, the one-time login link is time sensitive and expires after 24 hours. If you fail to click on the one-time link, login, and reset your password within 24 hours of receiving the system-generated email message, your account will automatically be blocked. Please send an email to DOECMS-Support@hq.doe.gov and request assistance to unblock your account.
Haven't logged in for a while?
If you have gone a couple weeks without logging into the CMS, chances are good that your account has been blocked. Again, this is an automated security precaution. Please send an email to DOECMS-Support@hq.doe.gov and request assistance to unblock your account.
ProTip: Best practice is to log in at least once a week to keep your account active.
How Do We Apply Taxonomy In Drupal?
Energy.gov Drupal platform employs global and office-specific vocabularies. Global vocabulary terms are shared by everyone in the platform; whereas, Office-Specific Topic terms are created at the request of a primary office group. These Office-Specific Topic terms are shared from the primary office group to its nested group(s), but these terms are not shared to other primary office groups.
Global Vocabularies
Energy.gov Platform Level Topics - a list of global terms that can be used to create collections of articles, download pages, or events based on a term. Multiple terms can be selected, but you must drill down to a term and add it. Then, drill down to the next term and add it. Only the bolded term at the end of a drill down is applied.
Energy.gov Platform Level Audience Terms - use these terms to target collections of articles, download pages, or events to specific audiences. Multiple terms can be selected.
Custom Topics - this freetext vocabulary allows us to create taxonomy terms on the fly. Sometimes there is a need to provide additional granularity to collections of articles, download pages, or events. In these cases, it may be necessary to combine an Office Specific Topic with a Custom Topic term. Please contact a System Administrator to work with the Custom Topic vocabulary.
Office-Specific Topic
Using the terms your office provided, system administrators created a list of Office-Specific Topics (OSTs) for your organization. Those Office-Specific Topics make up your organization's vocabulary. We can add to the vocabulary, if needed. Or, we can delete unused terms. Please contact a System Administrator, if you have questions about your office's vocabulary.
How Do I Cross-post Content Between Offices?
In order to crosspost content from one Office Group to display in the dynamic listings of another Group, you would need to have publishing access to both Groups, as well as the role permission to display the Additional Groups Audience controls. In most instances, DOECMS-Support@hq.doe.gov will be your contact, and we may redirect you to another user based on the Groups involved.

Recent Software Releases: Improvements & Updates
New User Training

The CMS is an application used to manage digital content for Energy.gov by granting access to DOE personnel to create, modify, and publish. In order to gain access to the Production environment, you will first need to complete the Energy.gov self-led training. It should only take a couple of hours start to finish! This self-led training is completed within the Learning Nucleus and on the CMS Training Site.
Please reach out DOECMS-Support@hq.doe.gov to initiate your training or with any questions.
The history of Energy.gov
Please contact CMS Support at DOECMS-Support@hq.doe.gov for any questions or concerns.
Contact Us
CMS Support
Washington, DC 20585