
Your air ducts are one of the most important systems in your home, and if the ducts are poorly sealed or insulated they are likely contributing to higher energy bills.
Your home's duct system is a branching network of tubes in the walls, floors, and ceilings; it carries the air from your home's furnace and central air conditioner to each room. Ducts are made of sheet metal, fiberglass, or other materials.
Ducts that leak heated air into unheated spaces can add hundreds of dollars a year to your heating and cooling bills, but you can reduce that loss by sealing and insulating your ducts. Insulating ducts in unconditioned spaces is usually very cost-effective. Existing ducts may also be blocked or may require simple upgrades.
Designing and Installing New Duct Systems
In new home construction or in retrofits, proper duct system design is critical. In recent years, energy-saving designs have sought to include ducts and heating systems in the conditioned space.
Efficient and well-designed duct systems distribute air properly throughout your home without leaking to keep all rooms at a comfortable temperature. The system should provide balanced supply and return flow to maintain a neutral pressure within the house.
Even well sealed and insulated ducts will leak and lose some heat, so many new energy-efficient homes place the duct system within the conditioned space of the home. The simplest way to accomplish this is to hide the ducts in dropped ceilings and in corners of rooms. Ducts can also be located in a sealed and insulated chase extending into the attic or built into raised floors. In both of these latter cases, care must be taken during construction to prevent contractors from using the duct chases for wiring or other utilities.
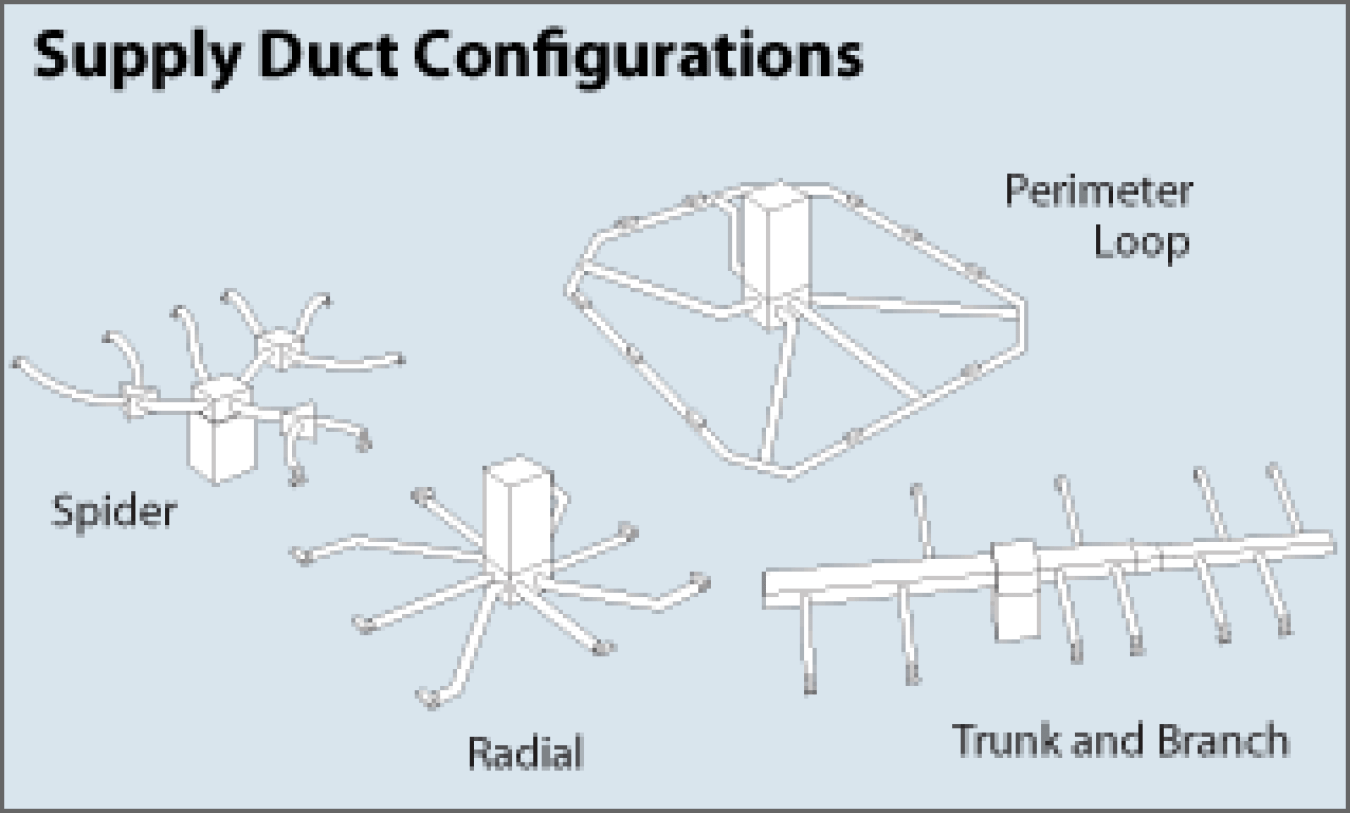
In either case, actual ducts must be used -- chases and floor cavities should not be used as ducts. Regardless of where they are installed, ducts should be well sealed. Although ducts can be configured in a number of ways, the "trunk and branch" and "radial" supply duct configurations are most suitable for ducts located in conditioned spaces.
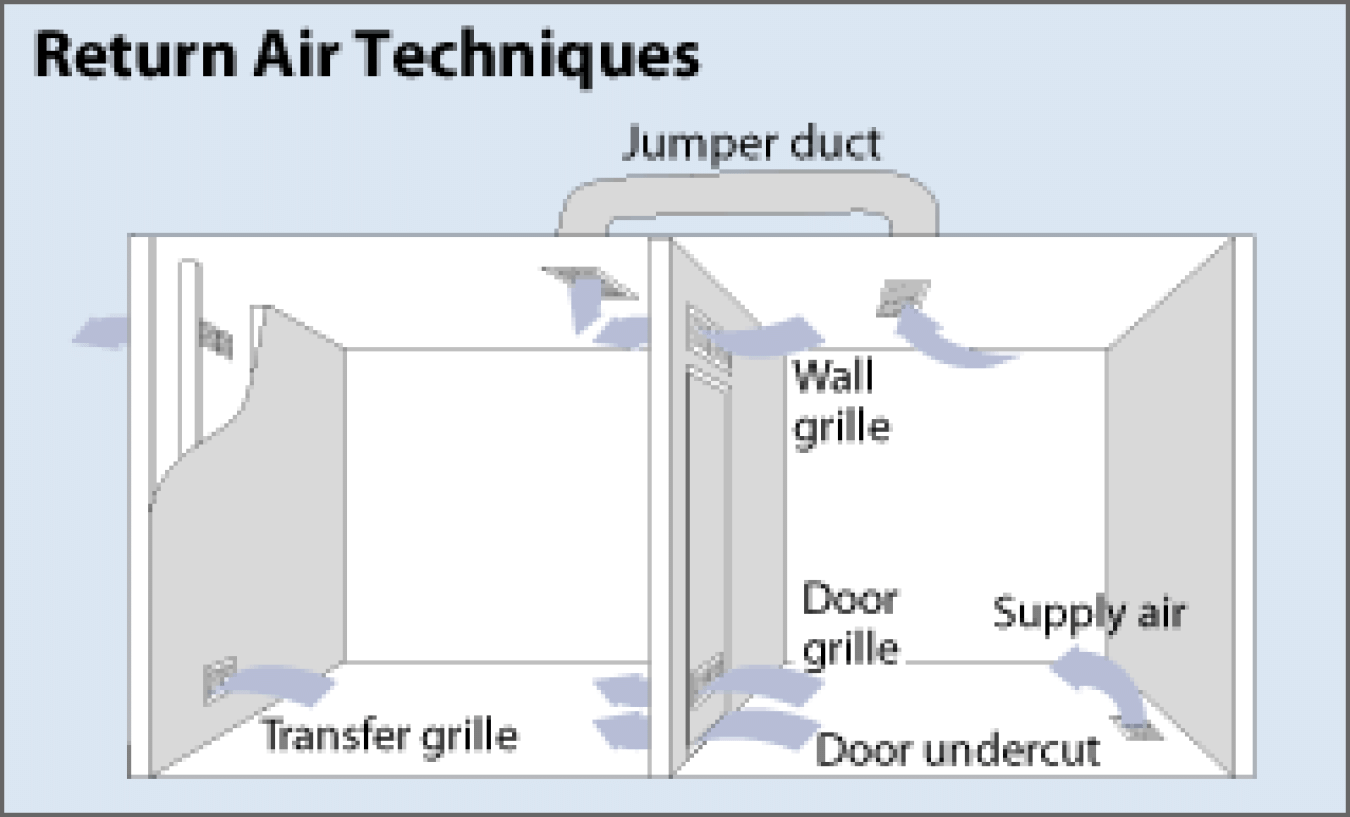
Air return duct systems can be configured in two ways: each room can have a return duct that sends air back to the heating and cooling equipment, or return grills can be located in central locations on each floor. For the latter case, either grills must be installed to allow air to pass out of closed rooms, or short "jumper ducts" can be installed to connect the vent in one room with the next, allowing air to flow back to the central return grilles. Door undercuts help, but they are usually not sufficient for return airflow.
-
Close all exterior doors and windows
-
Close all interior room doors
-
Turn on the central air handler
-
"Crack" interior doors one by one and observe if the door closes or further opens "on its own."
Whether it closes or opens will depend on the direction of the air handler-driven air flow. Rooms served by air-moved doors have restricted return air flow and need pressure relief as described above.
Maintaining and Upgrading Existing Duct Systems
Sealing your ducts to prevent leaks is even more important if the ducts are located in an unconditioned area such as an attic or vented crawlspace. If the supply ducts are leaking, heated or cooled air can be forced out of unsealed joints and lost. In addition, unconditioned air can be drawn into return ducts through unsealed joints.
Although minor duct repairs are easy to make, qualified professionals should seal and insulate ducts in unconditioned spaces to ensure the use of appropriate sealing materials.
Aside from sealing your ducts, the simplest and most effective means of maintaining your air distribution system is to ensure that furniture and other objects are not blocking the airflow through your registers, and to vacuum the registers to remove any dust buildup.
Existing duct systems often suffer from design deficiencies in the return air system, and modifications by the homeowner (or just a tendency to keep doors closed) may contribute to these problems. Any rooms with a lack of sufficient return airflow may benefit from relatively simple upgrades, such as the installation of new return-air grilles, undercutting doors for return air, or installing a jumper duct.
Some rooms may also be hard to heat and cool because of inadequate supply ducts or grilles. If this is the case, you should first examine whether the problem is the room itself: fix any problems with insulation, air leakage, or inefficient windows first. If the problem persists, you may be able to increase the size of the supply duct or add an additional duct to provide the needed airflow to the room.
Minor Duct Repair Tips
- Check your ducts for air leaks. First, look for sections that should be joined but have separated and then look for obvious holes.
- Duct mastic is the preferred material for sealing ductwork seams and joints. It is more durable than any available tape and generally easier for a do-it-yourself installation. Its only drawback is that it will not bridge gaps over ¼ inch. Such gaps must be first bridged with web-type drywall tape or a good quality heat approved tape.
- If you use tape to seal your ducts, avoid cloth-backed, rubber adhesive duct tape -- it tends to fail quickly. Instead, use mastic, butyl tape, foil tape, or other heat-approved tapes. Look for tape with the Underwriters Laboratories (UL) logo.
- Remember that insulating ducts in the basement will make the basement colder. If both the ducts and the basement walls are not insulated, consider insulating both. Water pipes and drains in unconditioned spaces could freeze and burst if the heat ducts are fully insulated be-cause there would be no heat source to prevent the space from freezing in cold weather. However, using an electric heating tape wrap on the pipes can prevent this. Check with a professional contractor.
- Hire a professional to install both supply and return registers in the basement rooms after converting your basement to a living area.
- Be sure a well-sealed vapor barrier exists on the outside of the insulation on cooling ducts to prevent moisture condensation.
- If you have a fuel-burning furnace, stove, or other appliance or an attached garage, install a carbon monoxide (CO) monitor to alert you to harmful CO levels.
- Be sure to get professional help when doing ductwork. A qualified professional should always perform changes and repairs to a duct system.
Carbon Monoxide Detectors
Carbon monoxide (CO) detectors are required in new buildings in many states. They are highly recommended in homes with fuel-burning appliances such as natural gas furnaces, stoves, ovens, water heaters, and space heaters. An alarm signals if CO reaches potentially dangerous levels.
Subscribe to receive updates from Energy Saver, including new blogs, updated content, and seasonal energy saving tips for consumers and homeowners.